
![]()
See About Pictometry Aerial Photos for an overview of Pictometry
and
Exploring Pictometry  for a quick overview of the tools in the legacy viewer.
 |
Changes the year the photo was taken. The new photo is displayed centered on the original red crosshair location on the default North view. |
There is no "default" tool.
Your Windows select cursor ![]() is shown initially.
The Windows select cursor is not a photo tool and has no function in the photo itself.
If you don't want to see the current Pictometry tool, simply
pick another tool that sticks, such as Set Crosshair, Zoom Box or Pan.
is shown initially.
The Windows select cursor is not a photo tool and has no function in the photo itself.
If you don't want to see the current Pictometry tool, simply
pick another tool that sticks, such as Set Crosshair, Zoom Box or Pan.
There are several zoom tools that zoom the photo in or out, magnifying or backing away from the image. The current photo magnification is displayed as a percentage along with the photo date and time on the far left of the tool bar. The default magnification or zoom level is 100%.
As you zoom in, the zoom level increases to more than one hundred percent: 133%, 178%, and so on, up to 999% and beyond in some cases. As you zoom out, the zoom level decreases to less than one hundred percent: 75%, 56%, and all the way down to 10%.
The 100% zoom level is special. As you zoom in from 100%, the picture starts to get fuzzy. As you zoom out beyond 100%, the picture can show minor artifacts caused by interpolating the photo pixels for display at the screen pixel size. At 100% magnification each photo pixel is displayed as exactly one screen pixel, showing the sharpest and clearest image possible. If you are going to screen capture or print the photo view, a zoom level of 100% should provide the best result.
The 100% zoom level is only meaningful for the main window photo. Photos displayed in the Quad View window are scaled to approximately 1/4 of the main window photo size.
 |
Zoom Box | Zoom Box zooms to an rectangular area you draw on the photo. Hold down the mouse button and drag the mouse to draw a rectangle over the area you want to display. When you release the mouse button, the photo zooms in to display the area within the rectangle. The Zoom Box tool "sticks" and remains the selected tool until you pick another tool. |
 |
Zoom In | Zoom In magnifies the photo by a fixed amount to show a closer view. Click the tool again to zoom in more. |
 |
Zoom Out | Zoom Out decreases the photo magnification by a fixed amount to show a view further away. Click the tool again to zoom out more. |
 |
Zoom 100% |
Zooms in or out to display the photo at the default 100% magnification.
At 100% magnification each main window photo pixel is displayed as exactly one screen pixel, showing the sharpest and most clear image possible.
The 100% zoom level is only meaningful for the main window photo. Photos displayed in the Quad View window are scaled to approximately 1/4 or the main window photo size. |
 |
Unzoom | Zooms out to display the entire photo. That is, it zooms to the full extents of the photo. If your viewing window is small, you may still need to use the scroll bars to see all of the photo. Or, use the Zoom Out tool to zoom out until you see the photo edges. |
 |
Pan | Pans moves the photo to display areas beyond the current view. Clicking Pan changes the cursor to a "hand". Press and drag the mouse button to drag the photo around. The Pan tool "sticks" and remains the selected tool until you pick another tool. You can also "pan" the view at any time using the scroll bars at the bottom and right of the photo. |
 |
Set Crosshair |
This tool moves the red crosshair to a new location you pick.
Pick the tool and then pick a point on the photo for the new crosshair location.
This tool "sticks" and remains the selected tool until you pick another tool.
The crosshair is generally the center of your area of interest and is used in several ways:
|
 |
Walking Man |
The Walking Man tool is another way to pan or move the photo while leaving a blue line trail on the photo.
An important feature of the Walking Man tool is the ability to "walk" to the adjacent photo in any direction.
You can't move to the next photo using the Pan tool.
The Walking Man tool is the only way to move to an adjacent photo.
If you want to move to a completely different area, it's best to use the
 Zoom Goto tool or the Zoom Goto tool or the
 Address Number Zoom Goto. Address Number Zoom Goto.
Using the Walking Man tool, you can pick a point on the photo and the "man" moves there from the last picked point or from the crosshair center on the first pick. Each pick refreshes the photo so it's best to not pick points too quickly. Pick a point and wait for the photo to catch up before picking the next point. You can also pick a point, hold down the mouse button, drag a "string" line to the desired location and then release the mouse button at the desired point. This is particularly helpful for "walking" long distances as you can literally drag the walking man off the photo window where the point you want to go to would be if the photo was there. This can be helpful when "walking" to the adjacent photo. While holding down the point outside the photo area, the photo scrolls until it gets to the edge of the particular photo. When you release the mouse, the adjacent photo is then displayed. You may want to Unzoom and then use this technique to quickly navigate to an adjacent photo.
The Walking Man tool "sticks" and remains the selected tool until you pick another tool.
You can clear the blue line drawn by the Walking Man tool by picking the Walking Man tool again
or by picking the |
|
Zoom Goto |
Finds a feature you specify and "zooms" to it on the current photo or another photo.
Picking the Zoom Goto tool opens a popup window with a drop-down list of search categories to choose from.
Categories include Parcel Code, Owner Name, Street Intersection, Schools, Street Number and more.
The Zoom Goto Street Number category does exactly the same thing as the separate You tell Zoom Goto what you want to see. Zoom Goto then finds the photo, zooms to the location within the photo and moves the crosshair to the point or centroid (geographic center) of the photo feature. Zoom Goto is the best, and sometimes only way, within Pictometry to navigate long distances across many photos. Often "less is more". That is, entering only the first portion of what you are looking for usually returns more results. This reduces the chance of not finding what you want if your entry has typos or doesn't match the database record exactly. Being completely explicit by specifying the full name may not be helpful. |
 |
N, S, E, W, Rotate View Clockwise, and Rotate View Counterclockwise buttons
The direction and rotation buttons are at the heart of using Pictometry. Photos views in each of four directions (looking North, South, East, and West) let you see all the sides of buildings and other features on the photos. You can get the best understanding of what you see by looking in all four directions.
Changing the photo direction also rotates the N, S, E, and W direction buttons. The direction you are looking toward always appears "depressed" and is on top to indicate it's the current direction. The button positions approximate the N,S,E,W indicator shown on the photo. They turn in lock step. It can be a bit confusing when you pick a N, S, E, or W direction button and the button you picked changes to a new direction and the picked direction moves to the top. You'll find it helps to pick the direction you want to look toward and then move the mouse cursor away from the buttons while the buttons change and the new photo is displayed. Better yet, use a rotation button to cycle through the four direction views. Picking a new center point before changing direction
When you change the photo direction, the photo view "rotates" around the red crosshair on the photo.
That is, the new photo will be positioned at approximately the same place as the photo you are viewing.
However, if you've moved the view using the scrollbars or the Pan or Zoom Box tools, when you change
direction the new view will be back at the location first shown on the first direction's photo.
If you've moved the photo view by panning, zooming or scrolling you can use the
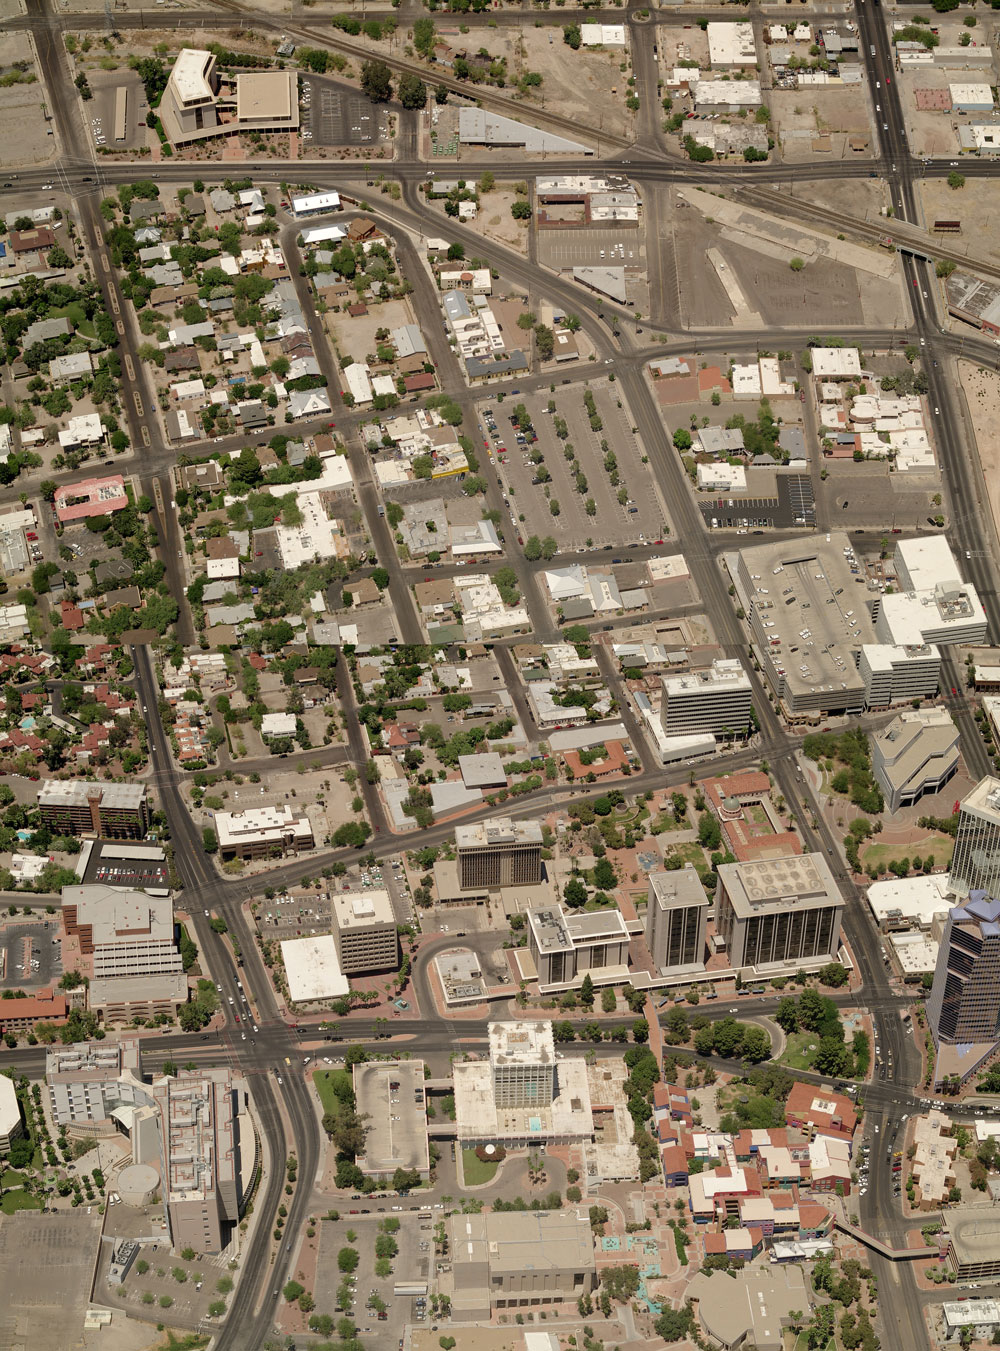
The "O" (Orthophoto) button
The "O" in the center The orthophotos you see using this "O" button are simple straight down views that have been spatially corrected to be orthophotos. Our Orthophoto Imagery page explains more about orthophotos. |


|
Next Photo and Previous Photo |
Switch to different photos showing the same point on the ground and looking in the same direction.
The Next Photo and Previous Photo tools show additional photo views that are useful in some situations. They are not essential to using Pictometry effectively. Unlike Internet Explorer's similar arrow buttons, Next Photo and Previous Photo do not move forward and back in your Pictometry viewing history. These tools enable you to see somewhat different views of the area in the same direction that may help you, but aren't what Pictometry considers the "best" photo. They are in addition to the views you get by changing directions (N,S,E,W). You can think of these different views as a "stack" of photos that all include your area of interest and where Pictometry has chosen one to be displayed by default. The "stack" includes several different photos of the area on the ground as defined by the red crosshair location and all looking in the current direction. There may be as few as 2 or 3 photos or as many as 9 or 10 photos in the same direction that show each location on the ground. The additional photos have these differences:
The photo you see by default at any of the N,S,E,W directions is the one that Pictometry considers the "best", having the best viewing angle, the best distance from the camera, and is not near the edge of the photo. The default "best" photo may be anywhere in the "stack" of photos that include the red crosshair point. The Next Photo tool moves forward in the stack. The Previous Photo tool moves backwards in the stack. Since the number of available photos at the red crosshair location varies and the position of the default "best" photo in the stack varies, the number of photos after and before the default photo varies. The relative position (+1, +2,+3, -1, -2, etc) is displayed at the left end of the Pictometry toolbar whenever a photo other than the default photo is being displayed. The "stack" of photos for the East, South, and West directions only include oblique photos. The stack for the North direction also includes othogonal (straight down) photos and a USGS Quad Map basemap in addition to the oblique photos. |

|
Quad View |
Opens a new window showing all four directions (North, South, East, West) at once.
The views are centered on the location of the red crosshair.
Quad View may be slow for many users due to the time it takes to download the four photos.
Dual monitors (or at least a large monitor) are helpful when using Quad View but it works with any screen.
|
 |
Photo Overview |
Opens a popup window showing the full extents of the current photo.
The main photo window initially shows just a portion of the whole photo.
The Photo Overview shows the displayed area in the context of the entire photo.
The red crosshair appears on both the main photo and the Photo Overview at the same ground location.
The crosshair can be moved on either the main photo or the overview photo:
|
 |
Zoom to MapGuide |
Zooms to the Pictometry crosshair location on the Main MapGuide Map.
Pictometry opens a new MapGuide map window for its use.
It helps to have dual monitors displaying Pictometry and Mapguide but it works with one.
The MapGuide map tracks the location of the Pictometry crosshair. That is, moving the Pictometry crosshair location re-centers the MapGuide map at that location. You can move the Pictometry crosshair with the Set Crosshair, Walking Man, and Zoom Goto tools. If Pictometry already has a MapGuide map window open, then this tool gives that MapGuide window "focus" by moving it to the forefront if it's behind other windows. MapGuide windows that were not opened inside of Pictometry are not used for the zoom. |
 |
Get Photo Information | Displays information about the current photo including photo date, time, file name, and more. |
 |
Get Parcel Information at Crosshair | Displays information about parcel under the crosshair. The displayed "parcel detail" page is the same page displayed by double-clicking on a parcel in a MapGuide map. If the crosshair is not on the parcel you want, then use the "Set Crosshair" tool button to move the crosshair somewhere in the parcel you want. |
 |
Draw Dot | This tool draws a green dot at a location you pick. Pick the tool and then pick a point on the photo to draw the green dot. This tool does not "stick" and needs to be selected for each dot you draw. |
 |
Remove Dots | This tool removes all the green dots drawn with the Draw Dot tool. There is no way to remove or move individual dots. |
 |
Download Photo as JPG |
This tool downloads and opens the current photo in a new web browser window using the full JPG file for saving on your computer.
The full photo is downloaded, not just the current view. You can display, print, or use the saved JPG file in any photo or graphics program of your choice, even Microsoft Paint included with Windows. There is no way to clip or trim the photo to just your area of interest before downloading. You may want to clip after downloading in your photo or graphics program. Once the full photo is downloaded into a new window the photo can be saved as a JPG file from that new window. The easiest way to save it as a JPG file is:
It's also possible to download as a JPG file using File, Save As... from the Internet Explorer tools menu. However, the process isn't as clean or simple as right-clicking over the photo and choosing "Save Picture As...". Due to the perspective nature of Pictometry oblique photos, it's not possible to seamlessly join individual photos to make an image of a larger area. This is because the scale and size varies from near to far across each photo. For example, see two adjacent photos and what happens attempting to merge and align them on a large parking garage near the right edge. You can easily see that the building sizes are different and that the streets don't line up. (There is one exception for joining Pictometry oblique photos. Using Esri's ArcMap software with the Pictometry for ArcGIS Desktop extension and access to the photo library, individual oblique Pictometry photos can imported into the ArcMap Data view. Each individual photo is stretched to a consistent scale across the photo, making it possible to see multiple photos aligned on the map. While this "flattens" out the perspective view, the oblique nature of the photos is retained.) |
 |
Address Number Zoom Goto |
Zoom to a street address by entering the address number.
"Adr Num" is a Zoom Goto function dedicated to searching for an address by entering just the street number.
It does exactly the same thing as the "Street Number" category search available by picking the
Zoom Goto tool button.
The Pictometry "Adr Num" button works just like the "Adr Num" button at the top of our MapGuide maps. Enter the street number for an address of interest, pick the button, and select the full address from the displayed list of addresses starting with that number. This is the easiest and most accurate way to search for a parcel by address. |
 |
Unfortunately, the Legacy Pictometry Viewer has no built-in printing capability. The print button shows the Printing Pictometry Aerial Photos page that explains how to save or capture the photo for printing. | |
 |
Help | Shows this Pictometry help page. |
 |
Feedback | Opens a feedback form to submit comments, questions, or suggestions. |
 button.
The button makes it easier and faster to use this commonly used Zoom Goto category.
button.
The button makes it easier and faster to use this commonly used Zoom Goto category.


 buttons change the view to a different photo looking toward the selected button direction.
Pick the direction you want to look toward.
buttons change the view to a different photo looking toward the selected button direction.
Pick the direction you want to look toward.
 and Rotate View Counterclockwise
  buttons rotate the view approximately 90 degrees, allowing
you to click through all four directions with one button.
buttons rotate the view approximately 90 degrees, allowing
you to click through all four directions with one button.
 button stands for "Orthophoto".
The orthophoto view is a view looking straight down.
Orthophotos are not "oblique".
They are not angled views like the other Pictometry photos.
You can't change the direction of the orthophotos.
The top of the orthophoto is always north.
button stands for "Orthophoto".
The orthophoto view is a view looking straight down.
Orthophotos are not "oblique".
They are not angled views like the other Pictometry photos.
You can't change the direction of the orthophotos.
The top of the orthophoto is always north.